Probably anyone who enjoys Asian cuisine has already come across Kimchi. Often encountered in the form of spicy-sour pickled Chinese cabbage, it pairs wonderfully with meat dishes and is also used in fried rice, soups, and scrumptious pancakes.
What I didn’t know until recently is that Kimchi actually refers to the preparation method rather than the vegetable itself. In essence, any vegetable can be turned into Kimchi, but the most familiar version to us is the one made with Chinese cabbage.

Kimchi is a traditional Korean preparation method based on lactic acid fermentation, essentially equivalent to German sauerkraut—except we use white cabbage and don’t season it quite as spicy.
The fascinating aspect of Kimchi is that the fermentation process not only preserves the vegetables but also turns them into an ideal source of nutrition due to the diverse nutrients and vitamins it contains.
Kimchi made from leafy vegetables, for example, is particularly rich in Vitamin A. Vitamin C is contributed by chili, as well as green onions. Additionally, it contains iron, valuable proteins, minerals, and up to 17 different amino acids. Furthermore, the lactic acid and acetic acid produced during fermentation have germ-killing properties. The fibers in Kimchi promote digestion, and the garlic and chilies help lower blood cholesterol levels.
Believe it or not, the vitamin content of kimchi doubles within three weeks due to the fermentation process.
It’s a true wonder vegetable that is a staple in every Korean kitchen. Their love for it goes so far that when a professor published an article in 2005 questioning the nutritional values of Kimchi, he received numerous death threats—not that we would go that far.
Although, I must admit, I’ve started eating it with almost every meal myself…
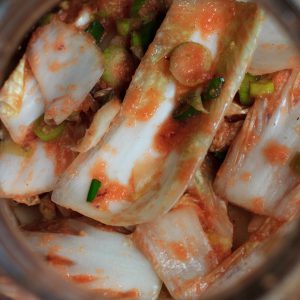
Homemade kimchi
Equipment
- 1 mason jar 2l
- 1 large bowl
- Chopping knife and board
- Blender
- 1 Large, heavy plate
- Cooking gloves
Ingredients
- 2 heads Chinese cabbage
- 1 1/2 cups Salt
- 1 l Water
- 1/2 cup Fish sauce
- Korean chili powder Gochugaru
- 2 tbsp Granulated sugar
- 1 bunch Spring onion
- 5 cloves Garlic
- 5 cm Fresh ginger
- 1 Nashi pear
- 200 g Daikon radish
- 1/4 Red onion
Instructions
- Prep:Remove the outer leaves from the cabbage, quarter it, and cut out the core wedge-shaped. Separate leaves in bunches from the quarters and rinse well in between the leaves in cold water, let them drain well.Fill a large bowl with cold water and dissolve half of the salt in it.Rub remaining salt in between the drained leaves, and massage them vigorously. Soak the salted cabbage bunches for at least five to six hours in the saltwater. It's best to weigh it down with a plate to ensure the cabbage is completely covered. I started the process relatively late in the evening and just let it stand overnight.After the soaking time, the cabbage should be almost rubbery. Remove it from the saltwater and rinse it vigorously under cold, running water at least twice. Let it drain well again.
- The Marinade:After the salting and soaking process, you can prep the marinade. In a blender, puree garlic, peeled ginger, red onion, peeled and cored pear. Then season with fish sauce, sugar, and chili. I intentionally did not specify the amount of chili; please season to taste. I used 4 heaped teaspoons, which is already quite spicy, but the heat diminishes over time. However, keep in mind that ginger also contributes to the spiciness.Wash the spring onions and cut them into fine rings. Peel the radish and cut it into fine julienne.
- Sterilizing:To sterilize the jar, preheat the oven to 100°C, wash the jar thoroughly, and dry it. Remove the lid with the rubber ring and place the jar along with the lid upright in the hot oven. Leave it in the oven for 20 minutes. Simply boil the rubber ring in water for about 10 minutes. Do not touch the inside of the jar after sterilizing and only use clean utensils. If your kimchi starts to rot, it is most likely because the tools or the jar were not properly cleaned.
- Marinating the Cabbage:Evenly coat the cabbage with the marinade, which works best by massaging it with your hands, really go in there in between the leaves. Don't forget to wear gloves!Mix in the radish with spring onions, then transfer the cabbage to the sterilized mason jar and seal it. Essentially the cabbage is ready; however, its typical sour, salty taste develops through fermentation.
- Fermenting:Admittedly, this is an improvised setup, real pros have an actual kimchi fridge and kimchi jars that regulate the fermentation. But, any dark place and room temperature will do for us this one time!Leave the jar standing, airing the jar every eight hours. Fermentation produces gases that need to be released regularly, as too much pressure can build up, and the jar could potentially burst – but you're probably familiar with this principle from young wine.Leave the jar like this for three days, then it's ready. If you like it more sour, just let it ferment longer; it's really up to you. Once it suits your taste, seal the jar and store it in your fridge to stop fermentation. This way, it will last for several months – unless you eat it up all at once right away because it simply tastes so delicious.
Normally, the marinade is thickened with rice starch, making the sauce very sticky and glossy. I left out the starch, making the kimchi gluten-free. Also, for a vegetarian version, simply omit the fish sauce!
Did you make this recipe?
Please let me know how it turned out for you!
Leave a comment below and tag @packts_an on Instagram, @annapackts on Mastodon and hashtag it #packtsan.